Website Support + How-to Videos
This page contains all sorts of help tips and tutorials for updating and using your Squarespace website. You will find links to download your brand files, Squarespace video tutorials, and gifs of important how-to’s customized your exact site.
MAKE SURE TO BOOKMARK THIS PAGE FOR EASY REFERENCE!
PAGE CONTENTS:
General Tips
Customized How To Videos
Squarespace Outage Help
Brand Guide
Website Styles
Campfire Alumni Link
General Tips
LOGGING IN TO SQUARESPACE
In your browser, type in your website URL and press the ESC key. Type in your email and password credentials and log in. Alternatively, you can always visit Squarespace.com and hit the log in button in the top right.
DASHBOARD
All of the tools you need to edit your website live within the dashboard list on the left. To adjust the content of your website, click on PAGES. For general settings, click on SETTINGS. We've set the styles of your site in our design process. If you need to adjust style settings, click on design DESIGN.
Linked Pages - Key areas of your website that you may want to edit or update over time are highlighted here.
Non-Linked Pages - Key areas of your website that you may want to edit or update over time are highlighted here. Non-linked pages are areas of your website that are available to the user but do not appear in the main navigation.
IMAGES
Images are one the easiest ways to update your site and make it look fresh. Here are some of the most common image tutorials you may need:
BASIC SQUARESPACE TUTORIALS
How to Videos
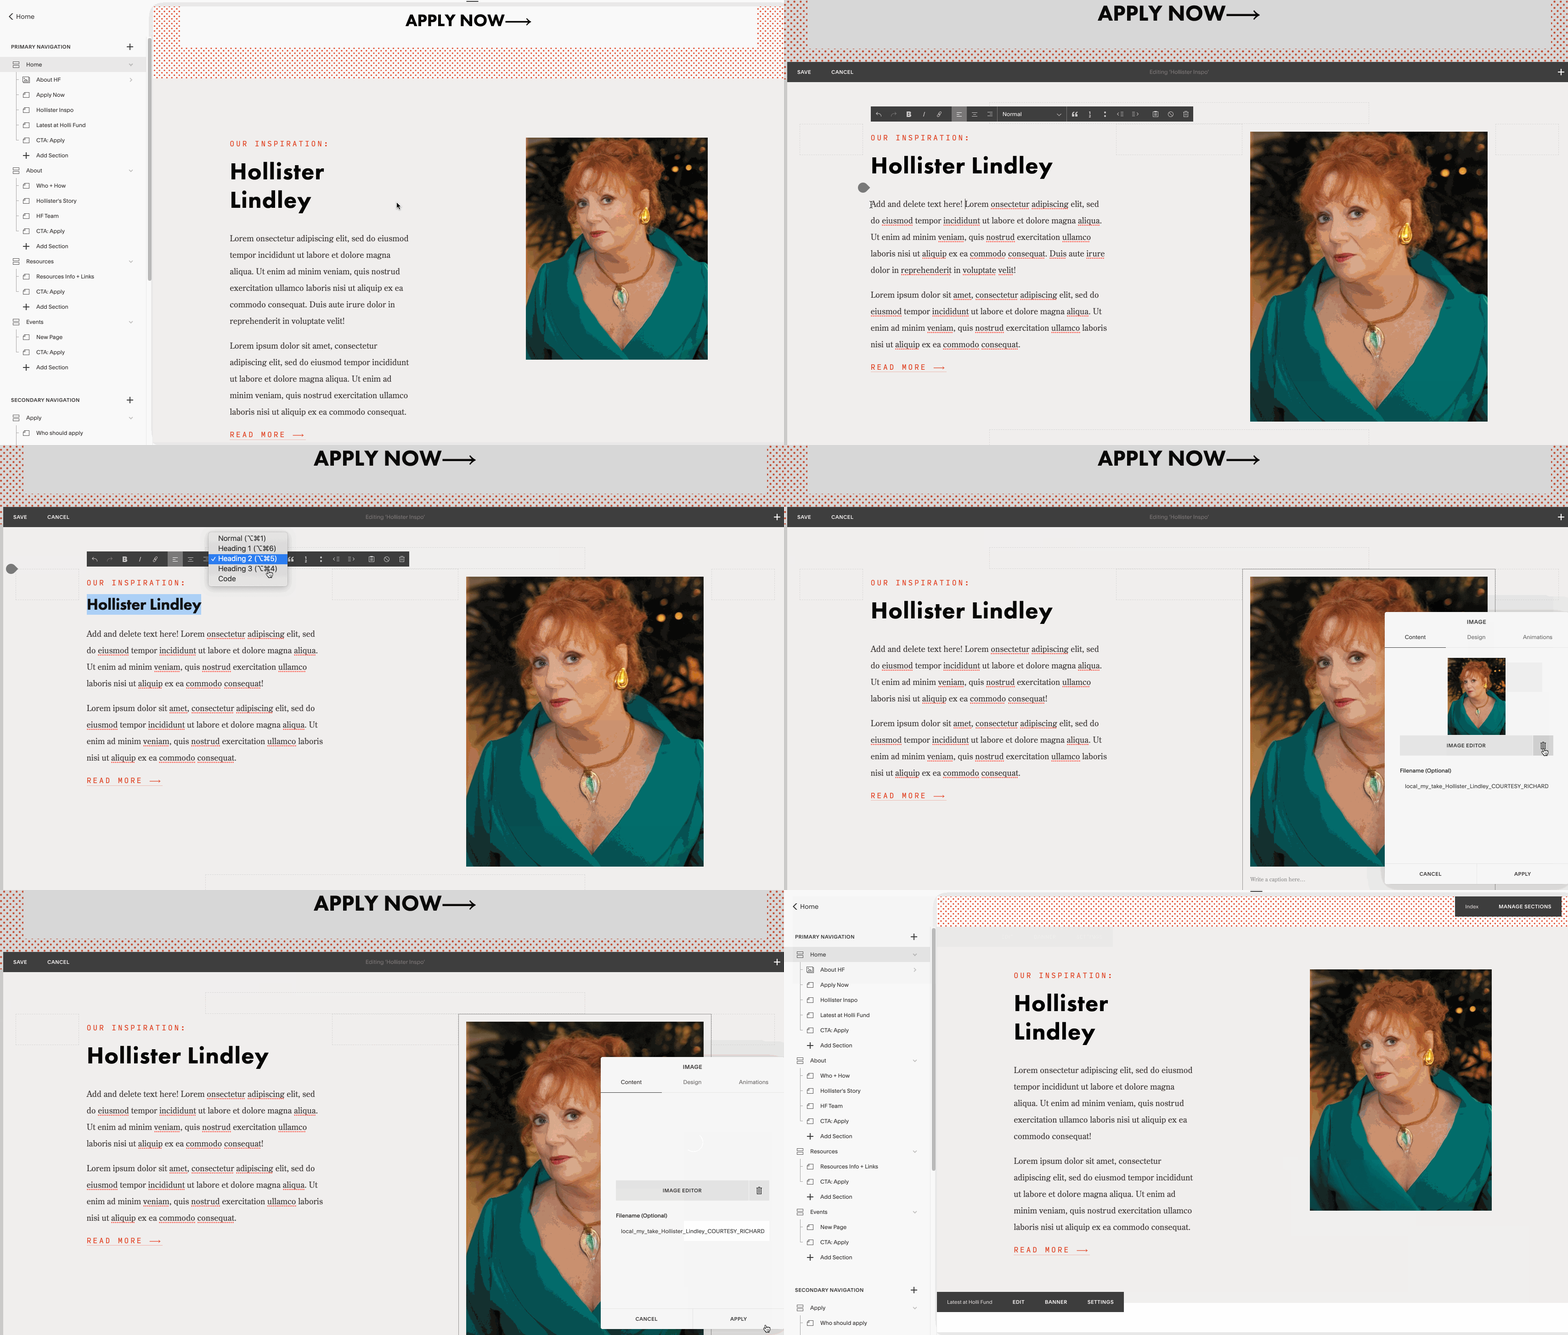
HOW TO EDIT TEXT/IMAGES
Hover on the page you wish to edit, click edit at the top menu bar when it appears. (Tip: You can also double click the text area you want to edit instead of using the menu bar).
Navigate your mouse to the text block and click into it. Edit the copy as you would any typical text document.
For Images, hover over the image you wish to edit and select EDIT.
Select upload image or drag+drop the new photo. Hit apply.
Click save on the top menu bar.
HOW TO edit A Gallery
Hover over the gallery, click the image icon, then click +.
To add new images from your device, click Upload Images.
To reuse images you already added or add stock images, click Search Images.
After uploading an image, you can:
Click Image Editor to edit the image.
Adjust the focal point. This may not affect how the image looks, depending on its aspect ratio and your style settings.
Enter a Description to add alt text. Descriptions don't display in the gallery section.
Add a clickthrough URL in the Link box.
Delete the image by hovering over its thumbnail and clicking the trash can icon.
How to add an event
the Blog Page panel, click the + icon.
To add a title for your post, click in the Enter a post title... box. Titles must be 200 characters or fewer.
Your new post includes a Text Block to help you get started. To add more blocks to the post, click an insert point.
After adding content to your post, click in the top-right corner to edit blog post settings like categories and tags, comments settings, and thumbnail images.
How to edit a form
Edit a page or post, click an insert point, and select Form from the menu. For help, visit Adding blocks.
In the Build tab of the block editor, set up your form.
Click Storage to add a storage option.
Click Advanced to customize advanced settings.
Click Apply to save your changes.
Help! Squarespace is slow, glitchy, or not working!
It happens! But have no fear, please bookmark and check out the Squarespace Help Twitter feed for updates on server outages and what the team is doing to fix the issue at hand. Server disruptions typically last no more than 30 minutes.
Brand Guide
Website Styles
Heading Style One
Heading Style Two
HEADING STYLE THREE
Body Copy Style:
Lorem Ipsum has been the industry's standard dummy text ever since the 1500s, when an unknown printer took a galley of type and scrambled it to make a type specimen book.
Button Styles:
Download Your Brand Files:
Thank you!
Thanks so much for trusting us with your brand! We are really proud of the work we’ve create together and are excited to continue to watch your brand grow. If you find yourself needing any additional features etc. please visit our Campfire Alumni page to submit a request. Cheers to more adventures!


